Discount Code Administration
Overview
The Discount Code Administration section allows 3PL administrators to create, manage, assign, and deactivate discount codes for registered companies.
Administrators can configure each discount code by defining its discount type, amount, expiration date, assigned companies, and Stripe Coupon ID. Discount codes can also be edited, activated, deactivated, or deleted as needed.
Once a discount code is assigned to a company and remains active, the company can view its discount information from the Billing section of the 3PLICITY platform.
Accessing Discount Code Management
To access Discount Code Administration:
Log in to the 3PL Back Office using your administrator account.
From the main dashboard, select Discount Codes.
The Discount Codes Management screen opens.
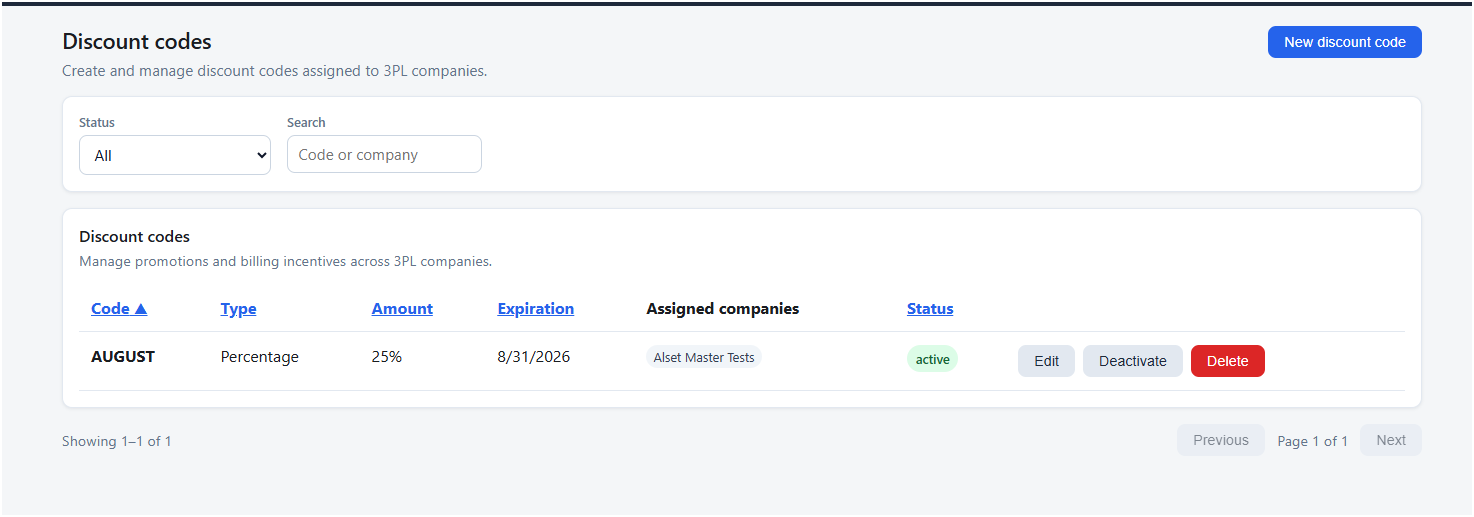
The Discount Codes Management screen provides a centralized view of all discount codes configured for the 3PL.
Administrators can also access the Discount Codes Management screen directly through the Back Office URL.
Discount Codes Management
The Discount Codes Management screen displays discount codes in a table with the following information:
| Column | Description |
|---|---|
| Code | The discount code assigned to the company. |
| Type | Determines whether the discount is a fixed amount or percentage. |
| Amount | The value of the discount. |
| Expiration | The date on which the discount code expires. |
| Assigned Companies | The companies associated with the discount code. |
| Status | Indicates whether the discount code is currently active or disabled. |
From this screen, administrators can create new discount codes or manage existing ones.
Creating a Discount Code
To create a new discount code:
Open Discount Codes from the Back Office.
Select Create New Code in the upper-right corner.
A discount code creation window opens.
Enter the required information.
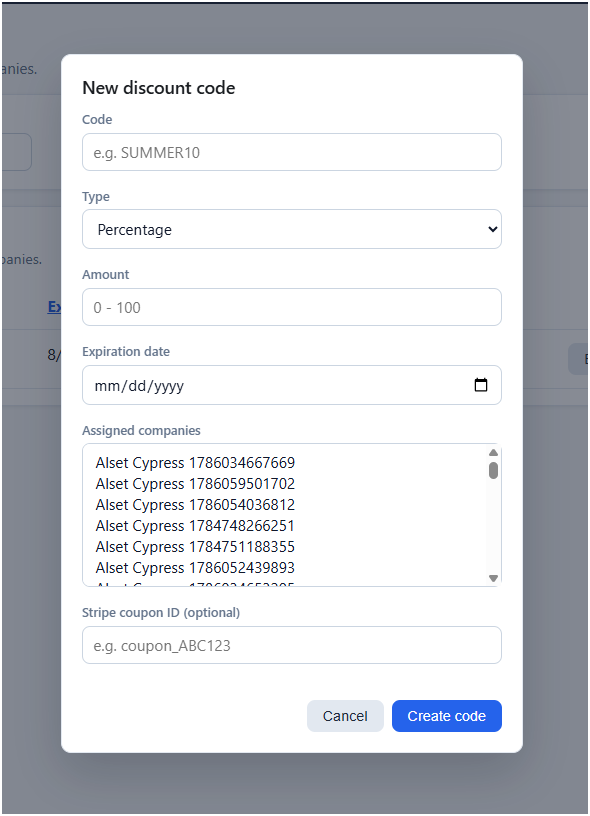
The creation window includes the following fields:
Code
Enter the code that companies will use as their discount identifier.
Type
Select the discount type from the dropdown:
Fixed — applies a fixed monetary discount.
Percentage — applies a percentage-based discount.
Amount
Enter the value of the discount.
The amount can be entered manually or adjusted using the available controls in the field.
Expiration Date
Enter the date when the discount code should expire using the MM/DD/YYYY format.
Alternatively:
Select the calendar icon.
Choose the desired expiration date from the date picker.
The selected date is added to the field.
Assigned Companies
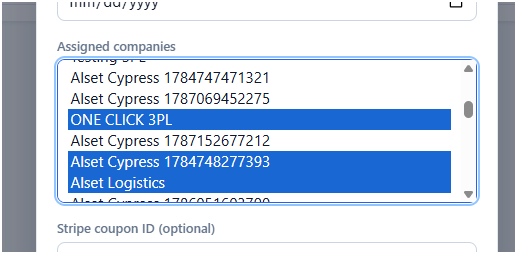
Select the companies that should have access to the discount code.
The assignment field provides a list of registered companies. One or multiple companies can be selected for the same discount code.
To select more than one entry, hold down Ctrl key + Click.
Stripe Coupon ID
Enter the corresponding Stripe Coupon ID associated with the discount code.
Once all required information has been entered, select Create Code.
The new discount code is added to the Discount Codes table and is available according to its assigned companies and status.
Viewing a Discount Code
After creating a discount code, its information is displayed in the Discount Codes table.
The table provides an overview of the configured:
Discount code
Discount type
Amount
Expiration date
Assigned companies
Current status
Active discount codes can be used by the companies to which they are assigned.
Editing a Discount Code
Administrators can update an existing discount code when its configuration needs to change.
To edit a discount code:
Open Discount Codes.
Locate the discount code in the table.
Select Edit.
The discount code information opens in an editing window.
Update the required fields.
Select Save Changes.
The available information can be updated, including the code, discount type, amount, expiration date, assigned companies, and Stripe Coupon ID.
The updated information is reflected in the Discount Codes table.
If the discount code is assigned to a company, the updated discount information is also reflected in that company's Billing section.
Deactivating a Discount Code
A discount code can be temporarily disabled without deleting it.
To deactivate a discount code:
Open Discount Codes.
Locate the active discount code.
Select Deactivate.
A confirmation window appears.
Select Confirm.
The discount code status changes to Disabled or Deactivated.
A deactivated discount code is no longer available to the companies assigned to it, and the code is no longer displayed in their Billing section.
Activating a Discount Code
A previously deactivated discount code can be activated again.
To activate a discount code:
Open Discount Codes.
Locate the disabled discount code.
Select Activate.
A confirmation window appears.
Select Confirm.
The discount code status changes back to Active.
Once active, the discount code becomes available again to its assigned companies and is displayed in their Billing section.
Deleting a Discount Code
When a discount code is no longer needed, administrators can permanently remove it from the Discount Codes list.
To delete a discount code:
Open Discount Codes.
Locate the discount code you want to remove.
Select Delete.
A confirmation window appears.
Select Confirm.
The discount code is removed from the Discount Codes table.
Deleted discount codes are no longer displayed in the assigned company's Billing section.
Discount Codes and Company Billing
Discount codes assigned to a company are available through that company's Billing section while the code is active.
The Billing section displays the applicable discount information, including:
Discount code name
Discount amount
Expiration date
This allows companies to view the discount information associated with their account directly from the 3PLICITY platform.
Administrators can control the availability of these discounts by updating the code, changing its assigned companies, deactivating it, or deleting it from Discount Code Administration.
Was this article helpful?
That’s Great!
Thank you for your feedback
Sorry! We couldn't be helpful
Thank you for your feedback
Feedback sent
We appreciate your effort and will try to fix the article