Creating Sales Orders as a Merchant
Overview
The Sales Orders feature allows merchants to create orders manually or automatically using a shipping label upload in order to fulfill customer purchases.
Merchants can either:
Manually enter customer and shipping information
Upload a PDF or image of a shipping label for automatic data extraction
Once created, the order becomes available to the associated 3PL company for processing and fulfillment.
Sales orders created through either method are stored with a Pending status and can be reviewed, managed, and fulfilled by the assigned 3PL company.
Accessing the Sales Orders Section
Log in to 3PLICITY using your Merchant credentials.
From the left navigation panel, click Sales Orders.
The Sales Orders section contains multiple tabs used to organize orders by status, such as:
Pending
In Progress
Cancelled
Shipped
Select the Pending tab to review existing orders or create a new one.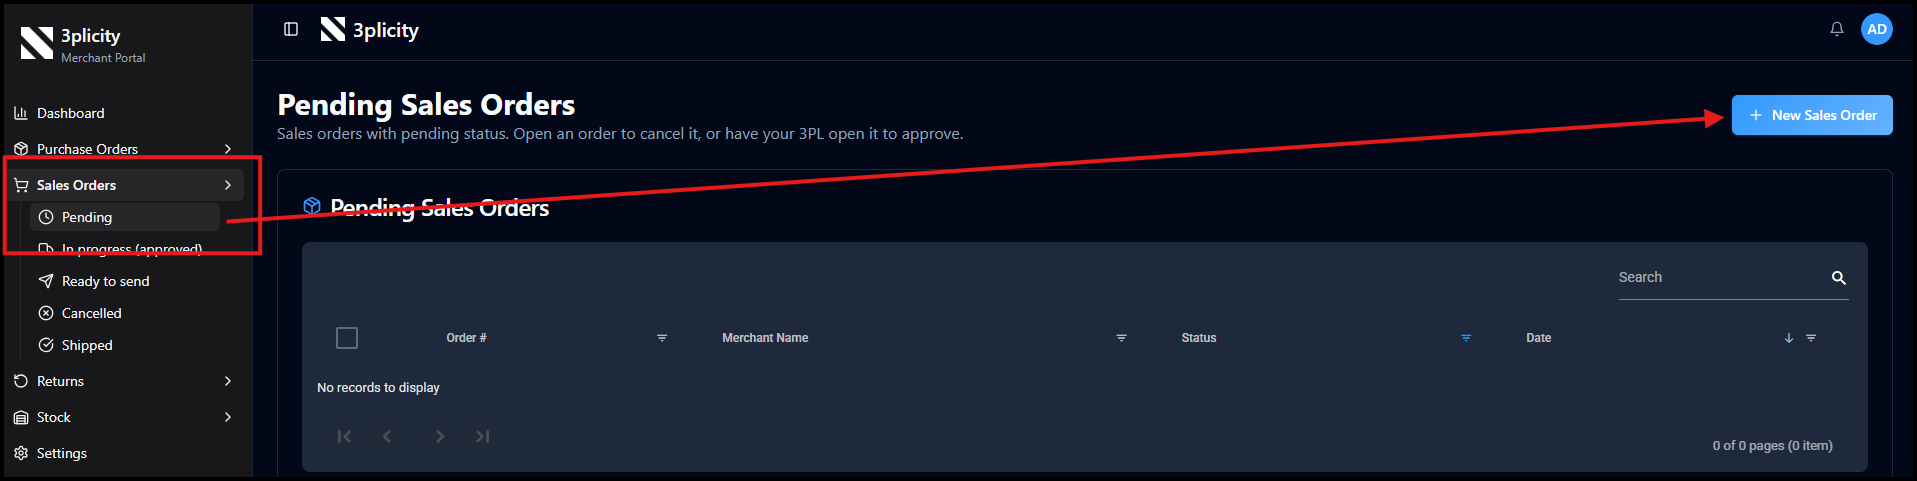
Creating a New Sales Order
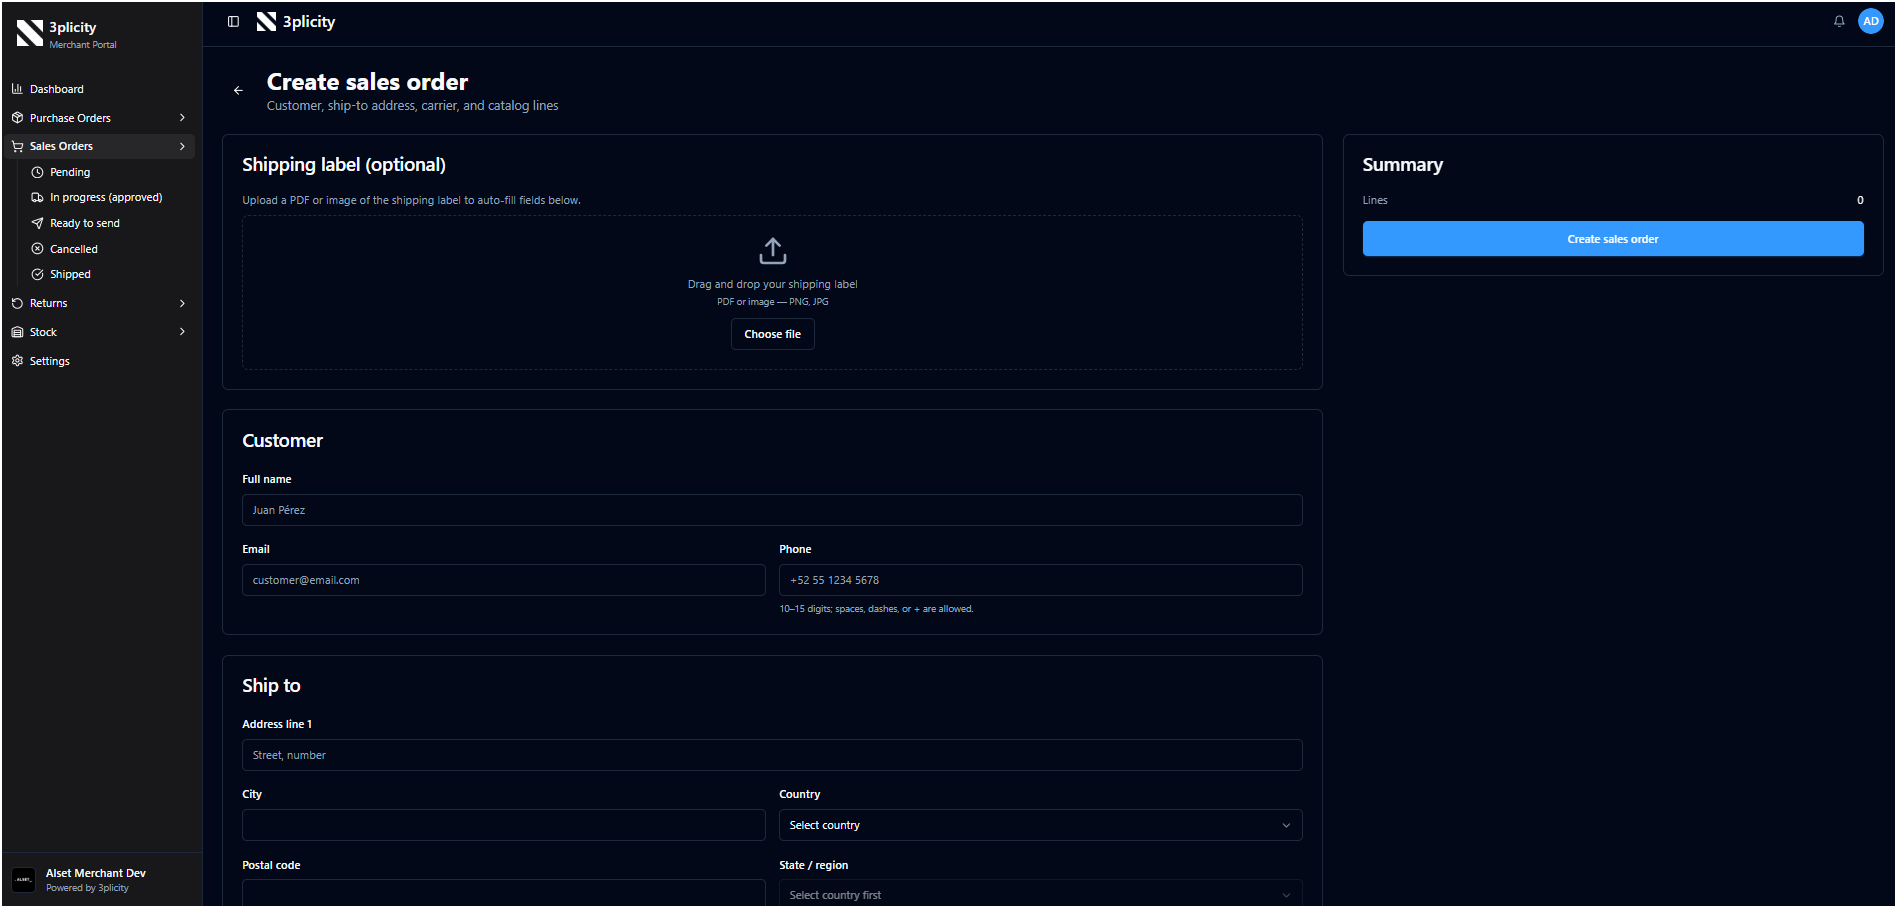
Click New Sales Order to open the order creation screen.
At the top of the page, merchants can choose between:
Entering order details manually
Uploading a shipping label for automatic data extraction
Option 1: Create a Sales Order Manually
The manual workflow allows merchants to enter all order information directly into the form.
Customer Information
Enter the customer’s:
Full name
Email address
Phone number
This information identifies the recipient and provides contact details for shipping and delivery purposes.
Shipping Address
Provide the complete delivery address, including:
Address line
City
State or region
Postal code
Country
This determines where the shipment will be delivered.
Shipping Details
Select the shipping method and carrier for the order.
Examples may include:
Ground shipping
Air shipping
UPS
FedEx
Optionally, merchants may also include:
Tracking number
Shipping label URL
These details help track and manage the shipment during fulfillment.
These details are required for the form but not strictly from a real shipping label if they don't have one, merchants can add examples such as their preferred carrier options;
- "FedEx", "Ground"
Adding Products (Line Items)
Click Add Line to include products in the order.
For each line item:
Select a product from the inventory dropdown.
Review the available quantity displayed by the system.
Enter the quantity to include in the order.
Additional products can be added as needed.
If necessary, any line item can be removed before submitting the order.
Option 2: Create a Sales Order Using a Shipping Label
Merchants can also upload a shipping label in PDF or image format to automatically extract shipping and customer information.
Uploading a Shipping Label
At the top of the order creation screen, click Attach a Shipping Label.
Upload either:
A PDF shipping label
An image file containing the shipping label
Supported labels may include carrier labels such as UPS, FedEx, USPS, or similar formats.
Shipping label must be perfectly scanned and not uploaded as a photo for best reading results.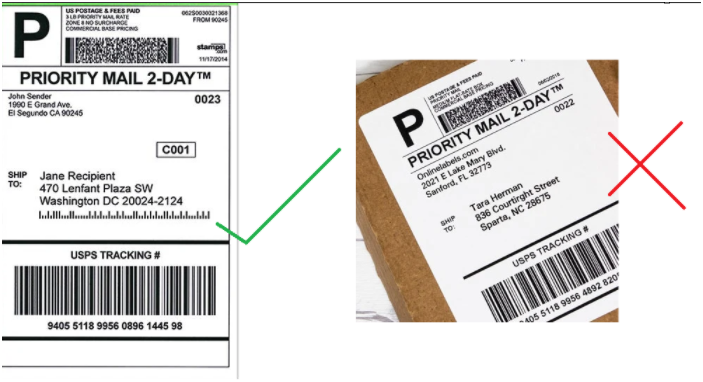
Automatic Data Extraction
Once uploaded, the system scans and reads the shipping label automatically.
The extracted information is used to populate fields such as:
Customer name
Shipping address
Carrier information
Tracking details
This reduces manual data entry and speeds up order creation.
Reviewing Extracted Information
After processing the label, the populated fields remain editable.
Merchants should review the extracted information and confirm that:
Customer details are correct
Address information is accurate
Carrier and tracking details match the label
Any field can be adjusted manually before submitting the order.
Adding Products to the Order
After reviewing the shipping information, products must still be added manually to complete the order.
Click Add Line and:
Select products from inventory
Define quantities
Review available stock
Multiple products can be added as needed.
Reviewing the Order Summary
As products are added, the Summary section updates automatically to display:
Total number of line items
Subtotal
Taxes
Total amount
This provides a complete financial overview before the order is submitted.
Submitting the Sales Order
Click Create Sales Order once all required information has been completed.
After submission, the system redirects to the order details page where merchants can review:
Customer information
Shipping address
Shipping method and carrier
Tracking details
Line items and quantities
Pricing totals
Each line item initially appears with a Pending status.
After Order Creation
Order Visibility
The new order appears under the Pending tab in the Sales Orders section.
The associated 3PL company can immediately access the order for fulfillment and shipping operations.
Inventory Updates
Product quantities are automatically updated based on the quantities included in the order.
This ensures inventory availability remains accurate across the platform.
Shipping Label Access
If a shipping label was uploaded or a shipping label URL was provided, merchants can access the label directly from the order details page.
This allows users to:
Review the label
Download the document
Access tracking information
Order Lifecycle
As the 3PL company processes the order, its status is updated throughout the fulfillment workflow.
Typical status updates include:
Pending
In Progress
Shipped
Delivered
Completed
All updates are reflected in real time within the Sales Orders dashboard.
Summary
Merchants can create sales orders either manually or by uploading a shipping label for automatic data extraction.
The platform streamlines order creation by allowing merchants to:
Enter customer and shipping information manually
Upload PDF or image shipping labels
Automatically populate shipping fields
Add inventory items
Submit orders directly to the 3PL company for fulfillment
Once submitted, orders are tracked throughout the fulfillment lifecycle until completion.
Was this article helpful?
That’s Great!
Thank you for your feedback
Sorry! We couldn't be helpful
Thank you for your feedback
Feedback sent
We appreciate your effort and will try to fix the article